Channel Overview
A SoundDesk channel is a single audio path: input, utilities, inserts, aux sends, fader, pan, and output routing. For channel-management operations (create, rename, duplicate, delete, hide, group), see Channel Management.
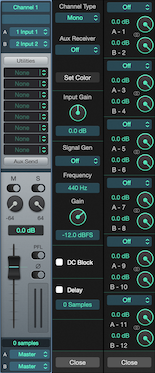
Audio I/O
Within the scope of a SoundDesk channel, audio flows from top to bottom. The A and B drop-down menus on top configure the input and the bottom ones the output destination for that channel.
Input options: None (no audio in), Bus options (receive from an I/O bus) or one of the available interface input options. See Audio Setup.
Output options: Master (send audio to the Master Section), Bus options (send to an I/O bus) or one of the available interface output options. See Audio Setup.
Note: SoundDesk channels have a stereo output by default, but if you set output A and B to point to the same Bus or device output, SoundDesk will automatically convert the stereo signal into mono (except for the Master option).
I/O Bus options: The I/O Buses can be used to route audio from a channel output to the input of another. They can be useful for sub-mixing or to send a channel output to a plugin side chain input.
Note: I/O bus receivers can send to other I/O buses, but only once per path, a sequential I/O bus will not be capable to send to yet another I/O bus. I/O bus senders and receivers can always send to Aux receivers, but Aux receivers can not use the I/O bus options to either receive or send.
Autofill: I/O options can use the autofill function by pressing the Alt/Option key while selecting.
Input section
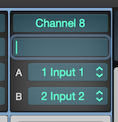
The input section, at the very top, includes a text box with a channel default name/type designation, followed by a user-assignable text box.
If a MIDI controller capable of displaying names is connected to SoundDesk via MIDI Desk Control, the user-assignable text will be delivered to it, when undefined SoundDesk will use the default name instead.
The A and B input drop-down menus, respectively, set the Left and Right input options for stereo channels.
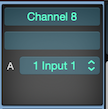
Mono channels only have one assignable input (A).
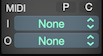
MIDI Instrument channels do not have any audio input options, instead, they will present MIDI Device and Routing options.
I/O
Input and Output MIDI devices.
[P] Pass-through
MIDI pass-through options, allow selected MIDI messages to be routed directly from the input device to the output device. This feature can be used for MIDI split and routing.
options:- SysEx Pass-through
- Active Channels Pass-through
- Inactive Channels Pass-through
[C] Channels
List of active/inactive MIDI channels.
Note: Use the Shift key to add more than one channel.
Utilities
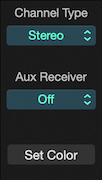
Each channel in SoundDesk includes a utilities view.
The user can use this section to configure the channel type: Stereo, Mono, MIDI Instrument or Auxiliary Receiver and colour assign.
It also includes Input Gain control, a signal generator (Sine, Square, Triangle, Sawtooth Up, Sawtooth Down Waves, Pink Noise and White Noise), a DC removal filter and a delay unit (in samples).
MIDI Instrument
In the Utilities > Channel Type section you can configure a channel as a MIDI Instrument, this will remove all audio input options and expose a MIDI device/routing selectors. MIDI messages from the selected device will be redirected to all capable plugins on that channel.
Note: To use MIDI to control the actual desk, please see MIDI and Desk Setup.
See Worked Example 1 — Playing a Virtual Instrument with a MIDI Keyboard below.
Aux Receivers
When a channel is set to be an Aux receiver, it retains all other audio I/O options with the exception of I/O buses. An Aux receiver will add all Aux senders to the default input if active.
Note: If you do not need the default input, set the input drop-down menus to None.
Set Color
Opens the standard colour picker.
Input Gain
Pre processing gain stage.
Signal Generator
Options: Sine, Square, Triangle, Sawtooth Up, Sawtooth Down Waves, Pink Noise and White Noise.
DC Block
Filters the DC component from the signal (pre processing).
Delay
Adds a delay (in samples) to the signal.
Auto-Mute
When the channel is open (unmuted and fader up), the Main Master, Stereo Out (master copy), or All (Main Master + Stereo Out) will be muted.
See Worked Example 2 — Mix-Minus for a Remote Caller below.
Inserts
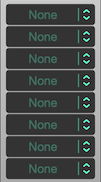
There are 8 available inserts on each channel.
Press the plugin name to open the insert window. To insert a new plugin click on the arrows next to the name and select one of the available options.
Drag-and-drop the insert to move it to another box, or drag-and-drop while pressing the alt key to copy (including settings).
⌘+Click to toggle the bypass option on and off.
ctrl+Click (right click) to see options and when available configure the Side Chain input.
See also: Plugin Manager for managing the Audio Unit plugin list available to the insert menu.
Side Chain Input
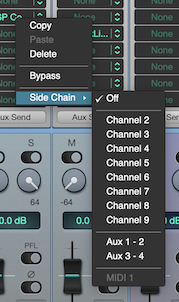
If a plugin has Side Chain support, the plugin menu will allow the user to select an input to be directed to it. Currently, all types of channels can be used for side chain with the exception of MIDI instruments.
Side chain buses are taken at the input stage of a channel, post signal generator but pre-all other channel processing. To use the output stage of a channel, you need to send it to an I/O bus first and set a new channel as the receiver, the created channel can then be used for side chain.
Note: This also means that if you set the side chain option to the channel where the plugin lives, the signal is pre any plugins that are placed above it.
See Worked Example 3 — Ducking Music Under Voice below.
Aux Send
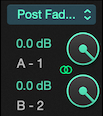
The "Aux Send" view gives access to the auxiliary send options. Aux Sends, can either be pre or post-fader, pan, mute, solo and phase invert (for A-B pairs). When the channel is set to Stereo, the A-B pair represents the Left and Right channels as with the other I/O options.

Link: this option will link the A-B pair controls.
Also See: SoundDesk Aux Setup.
Channel Controls
The bottom of each channel strip exposes the controls that shape the channel's contribution to the main mix.
Fader
The vertical slider that sets the channel's output level. ⌘-click or double-click to return to the default value.
Pan
Sets the channel's position in the stereo field. For mono channels, pan places the signal between the left and right outputs. For stereo channels, pan acts as a balance control between the A and B sides. The global Pan Law for mono channels is configured in MIDI and Desk Setup.
Mute
Silences the channel's main output.
Solo
Silences every other non-soloed channel on the main output. Multiple channels can be soloed simultaneously — they will all be heard, while everything else is muted. Solo affects what reaches the master; use PFL to audition without changing the main mix.
PFL (Pre-Fade Listen)
Routes a pre-fader copy of the channel to the dedicated PFL output, typically a separate headphone output. PFL is non-destructive — the main mix continues untouched. Multiple channels can be PFL-toggled at once.
Phase Reverse
Inverts the polarity of the channel's signal. Useful for correcting phase relationships when two microphones capture the same source.
Note: with Multi-Selection set to Apply to All in MIDI and Desk Setup, fader, mute, solo, PFL, and phase reverse actions apply to every selected channel at once. See Fader Groups for grouping channels so a single fader controls many.
•Examples•
Worked Example 1 — Playing a Virtual Instrument with a MIDI Keyboard
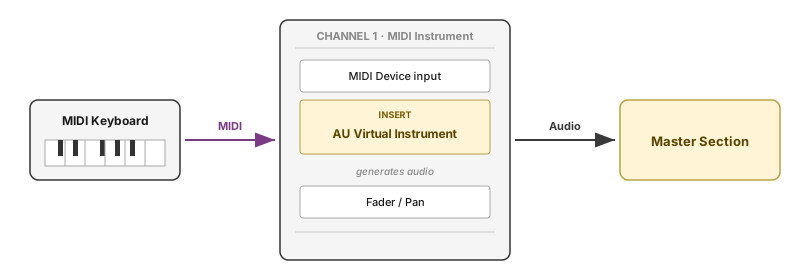
A MIDI keyboard drives an Audio Unit virtual instrument loaded as an insert; the resulting audio runs through the channel like any other source.
Setup:
- USB or interface-connected MIDI keyboard.
- An AU virtual instrument plugin installed (for example, Apple's DLSMusicDevice, or any third-party AU synth).
Routing:
- Choose Edit → New… to create a channel.
- In Utilities, set the channel Type to MIDI Instrument. The channel's Input section now shows MIDI Device selectors instead of audio inputs.
- Set the Input MIDI device to the keyboard. Optionally, narrow the listening range under [C] Channels to a specific MIDI channel.
- Open an empty insert slot and choose the virtual instrument from the plugin menu.
- Play notes on the keyboard — MIDI flows to the plugin, which generates audio that runs through the channel's inserts, fader, pan, and out to the Master Section.
From this point the channel behaves like any audio channel. Add EQ or compression as further inserts, send to aux receivers for headphone mixes, or route to an I/O bus for sub-mixing — all the same routing options as a microphone or line channel.
Worked Example 2 — Mix-Minus for a Remote Caller
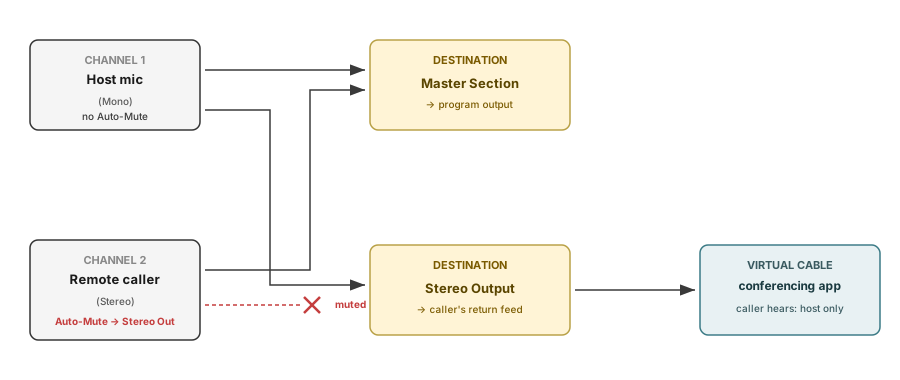
A remote caller needs to hear the host but not their own returning voice (otherwise the network delay creates a disorienting echo).
Setup:
- Channel 1 — Host mic (Mono).
- Channel 2 — Remote caller (Stereo), receiving their audio from the conferencing or call app.
- Stereo Output configured on the Master Section, routed back to the conferencing app as the return audio.
Routing:
- On Channel 2 (the remote caller), set Auto-Mute to Stereo Out.
- Route the Stereo Output to the return audio of the conferencing app, typically via a SoundDesk Virtual Cable.
The Auto-Mute on Channel 2 keeps the caller's voice out of the Stereo Out, so the caller hears the host's mix without their own returning voice.
Worked Example 3 — Ducking Music Under Voice
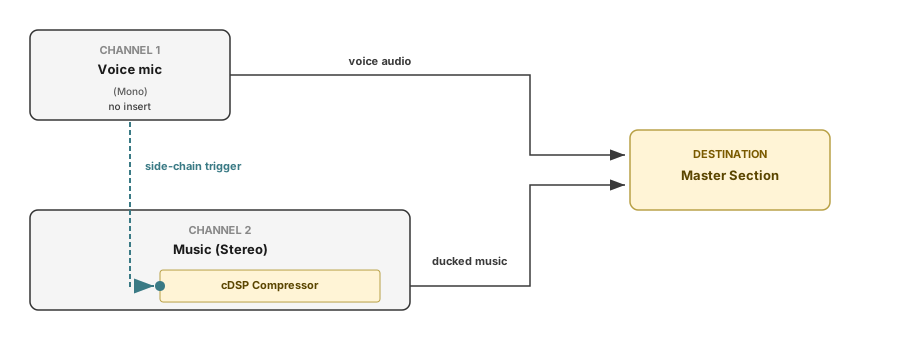
A common broadcast routing: the music bed automatically dips when the voice mic captures speech, then recovers when the voice stops.
Setup:
- Channel 1 — Voice mic (Mono). Insert: AUSoundIsolation (Apple AU) for voice isolation.
- Channel 2 — Music (Stereo). Insert: cDSP Compressor.
Routing:
- On Channel 2, ctrl-click (right-click) the Compressor insert and set the Side Chain Input to Channel 1.
- Set the Compressor's threshold so that the music plays uncompressed when the voice mic is silent.
- Use a moderate ratio (for example 4:1), a short attack, and a release that lets the music recover during voice pauses.
The Compressor on Channel 2 now reacts to Channel 1's signal rather than the music itself — when voice is present, the music ducks; when voice stops, the music returns.
The side chain signal is taken at the input stage of Channel 1, before any inserts on that channel. To trigger from a processed voice (for example, after a DeEsser or Maximizer), send Channel 1's output to an I/O bus, set a new channel as the bus receiver, and use the bus receiver as the side chain source.
Copyright © 2011 - 2026 LoudLAB. All rights reserved.
|
Products |
Downloads |
Support |
Follow Us |
Copyright © 2026 LoudLAB. All rights reserved. Terms & Conditions | Privacy Policy