Getting Started
Five steps from a fresh launch to a working desk. Each step links to the reference page that covers it in depth.
If terms like channel, bus, or aux send are unfamiliar, read Core Concepts first.
1. Configure Audio I/O
Open Audio Setup from the menu. Pick the interface that should serve as SoundDesk's input and output, set the sample rate (48 kHz is the common default), and set the buffer size. Smaller buffers reduce latency but raise CPU cost — start at 128 or 256 samples and adjust if audio artifacts become audible.
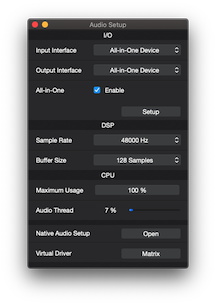
If you need to combine several interfaces, or to pull audio in from other applications (Spotify, a video conferencing app, a browser tab), enable the All-in-One Device and add the devices and applications you need. See System Audio Capture for the application capture details (macOS 14.5+).
If low latency is a priority — live performance, or monitoring vocals or guitar through plugins — prefer a single physical interface and disable the All-in-One Device. The All-in-One Device adds overhead a direct interface does not (latency alignment, drift correction, sample rate conversion). When direct routing is enough, use it.
Reference: I/O, Audio Setup. Background: Core Concepts: Physical and Virtual Devices.
2. Create Your Channels
From the menubar, choose Edit → New… to add one channel for each source you want to mix. You can change the channel type later from the Utilities view:
Mono — a single microphone or mono line source.
Stereo — a stereo line input, a music application, or any source meant to be heard as a Left/Right pair.
Auxiliary Receiver — a channel that listens to aux sends from other channels. Use this for reverb returns, headphone mixes, and parallel processing.
MIDI Instrument — a virtual instrument driven by incoming MIDI notes.
On each channel, set the input A (and B for stereo) to the appropriate interface input. Name and colour the channels so you can find them at a glance during a session.
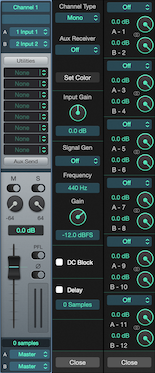
Reference: Channel Overview.
3. Set Up Monitoring
On the Master Section, set the master output to your headphone interface output. Talk into a channel and confirm the master meter responds and audio is heard.
For solo-checking a channel without affecting the main mix, use the PFL output: set its destination to a separate headphone output, then toggle PFL on any channel to listen to it pre-fader.
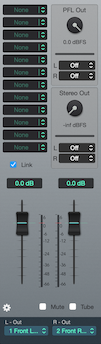
Reference: Master Section.
4. Add a Plugin
Pick a channel and click into an empty insert slot. Choose a plugin — an EQ or a gate is a good starting point. The plugin window opens; adjust the parameters.
Multiple inserts on a channel run in series, top to bottom, before the fader. Drag-and-drop reorders them; ⌘-click bypasses an individual insert; ctrl-click exposes side-chain and other plugin options.
The Master Section has its own insert chain (up to 12 plugins) for processing the whole mix — same drag-and-drop and bypass behaviour as channel inserts.
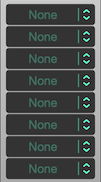
Reference: cDSP Inserts (the built-in plugins), Channel Overview: Inserts (insert mechanics), Plugin Manager (managing the AU plugin list).
5. Save Your Desk
Choose File → Save and give the desk a name that matches the scenario (e.g. "Podcast", "Live Stream", "Band Rehearsal"). The saved file captures every channel, bus, aux send, plugin, and routing choice.
Keep one desk file per scenario and switch by opening the matching file. Up to 5 desks can run simultaneously if you need them side by side.
Reference: File Types & Recording.
•Examples•
Worked Example 1 — Vocal Mic + Guitar Line
Difficulty: Low
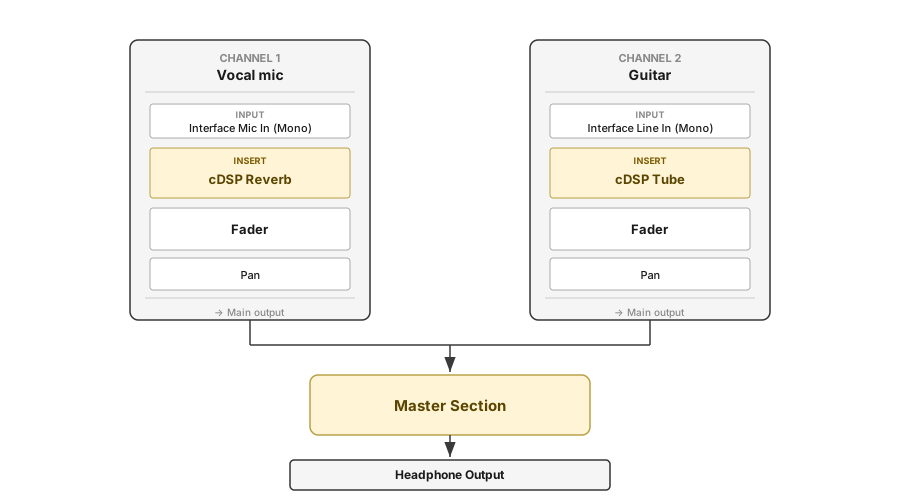
Putting steps 1–5 together for a singer-guitarist setup: one microphone for vocals, one line input for guitar, each with its own insert plugin.
Setup
- Channel 1 — Vocal microphone (Mono); input A set to the interface's mic input. Insert: cDSP Reverb (room or plate).
- Channel 2 — Guitar (Mono); input A set to the interface's line input. Insert: cDSP Tube (e.g. the Distortion II template).
Steps
- Configure Audio I/O. In Audio Setup, pick the interface, set the sample rate, and start with a moderate buffer (128 or 256 samples). For live monitoring you may prefer a lower-latency setup by disabling the All-in-One Device.
- Create the channels listed above (Edit → New…).
- Set up monitoring. On the Master Section, route the master output to your headphone output. Speak into the mic and play a note on the guitar to confirm both meters respond.
- Add the plugins on each channel as listed above.
- Save the desk. Choose File → Save and name it "Voice & Guitar". Reopening the file restores the channels, plugins, and settings.
From here, the natural extensions are an EQ before the reverb to shape the vocal, a compressor to even out dynamics, or a pre-fader aux send into an auxiliary receiver for a dedicated performer headphone mix — see Core Concepts for the patterns.
Worked Example 2 — Two-Host Podcast (using the All-in-One Device)
Difficulty: Mid
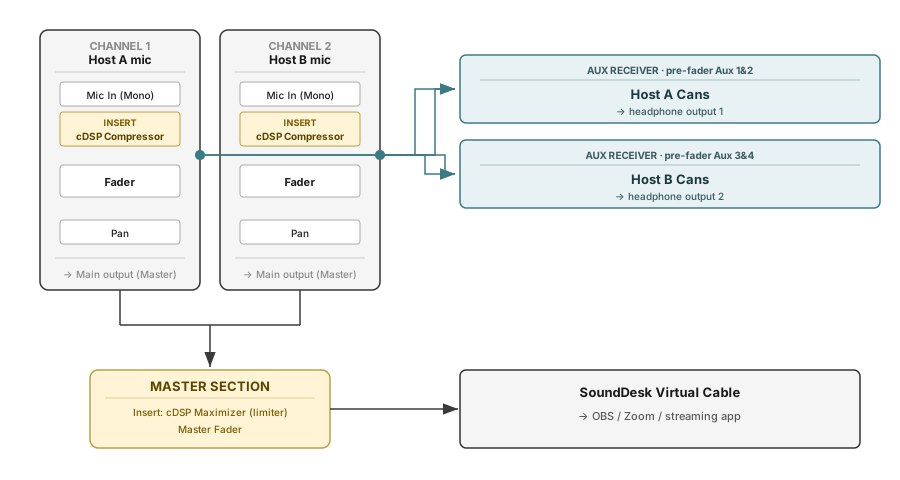
A two-host podcast where each host has their own audio interface — a common remote/distributed setup. The All-in-One Device combines the two physical interfaces into a single logical source, so SoundDesk sees all mic inputs and headphone outputs as one device. Each host gets their own pre-fader headphone mix, and the final mix is sent to a streaming application via a SoundDesk Virtual Cable.
Setup
- Channel 1 — Host A microphone (Mono); input A set to Host A's interface mic input. Insert: cDSP Compressor (gentle compression to even out dynamics).
- Channel 2 — Host B microphone (Mono); input A set to Host B's interface mic input. Insert: cDSP Compressor (gentle compression to even out dynamics).
- Channel 3 — Auxiliary Receiver 1&2, named "Host A Cans"; outputs A/B set to Host A's headphone output.
- Channel 4 — Auxiliary Receiver 3&4, named "Host B Cans"; outputs A/B set to Host B's headphone output.
- Master Section — Insert: cDSP Maximizer (as a limiter, to keep loud peaks from clipping).
Aux sends
On Channels 1 and 2:
- aux 1&2 pre-fader → Channel 3 (Host A Cans)
- aux 3&4 pre-fader → Channel 4 (Host B Cans)
Each host now has a stable headphone mix containing both voices, independent of how the audience mix is balanced.
Steps
- Configure Audio I/O. In Audio Setup, enable the All-in-One Device. Add both host audio interfaces (each providing one mic input and one headphone output) to the All-in-One Device in the Setup view. See Audio Setup - All-in-One for the complete reference.
- Create the channels listed above (Edit → New…) and wire the aux sends as specified.
- Set up monitoring. On the Master Section, route the master output to a SoundDesk Virtual Cable so OBS or your streaming app receives the broadcast mix. Speak into a microphone and confirm both the master meter and the host headphone outputs respond.
- Add the plugins on each channel and on the master as listed above.
- Save the desk. Choose File → Save and name it "Podcast". The All-in-One Device configuration, channels, aux routing, plugins, and master destination are all preserved.
Save additional desks for different scenarios. Up to 5 desks can run simultaneously if you need them side by side.
Next Steps
The desk works. Where to go from here:
- Understand the why. If you skipped it, read Core Concepts — the mental model makes every later decision easier.
- Group channels. When one fader and one plugin chain should cover many channels (drum kit, vocal group), use an I/O bus.
- MIDI control. Assign a hardware controller to faders, mutes, and pans — see MIDI and Desk Setup.
- Tame plugin latency. If you load plugins with high reported latency, read Latency and ADC to understand how SoundDesk compensates.
Copyright © 2011 - 2026 LoudLAB. All rights reserved.
|
Products |
Downloads |
Support |
Follow Us |
Copyright © 2026 LoudLAB. All rights reserved. Terms & Conditions | Privacy Policy